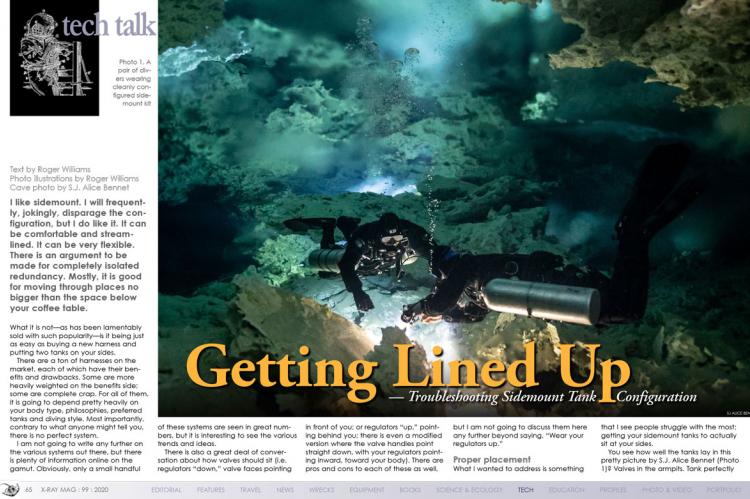
Getting Lined Up: Troubleshooting Sidemount Tank Configuration
I like sidemount. I will frequently, jokingly, disparage the configuration, but I do like it. It can be comfortable and streamlined. It can be very flexible. There is an argument to be made for completely isolated redundancy. Mostly, it is good for moving through places no bigger than the space below your coffee table.

Photo 1. A pair of divers wearing cleanly-configured sidemount kit. Cave photo by S.J. Alice Bennet.


. Photo-illustration by Roger Williams.")


. Photo-illustration by Roger Williams.")


Tags & Taxonomy
What it is not—as has been lamentably sold with such popularity—is it being just as easy as buying a new harness and putting two tanks on your sides.
There are a ton of harnesses on the market, each of which have their benefits and drawbacks. Some are more heavily weighted on the benefits side; some are complete crap. For all of them, it is going to depend pretty heavily on your body type, philosophies, preferred tanks and diving style. Most importantly, contrary to what anyone might tell you, there is no perfect system.
I am not going to write any further on the various systems out there, but there is plenty of information online on the gamut. Obviously, only a small handful of these systems are seen in great numbers, but it is interesting to see the various trends and ideas.
There is also a great deal of conversation about how valves should sit (i.e. regulators “down,” valve faces pointing in front of you; or regulators “up,” pointing behind you; there is even a modified version where the valve handles point straight down, with your regulators pointing inward, toward your body). There are pros and cons to each of these as well, but I am not going to discuss them here any further beyond saying, “Wear your regulators up.”
Proper placement
What I wanted to address is something that I see people struggle with the most: getting your sidemount tanks to actually sit at your sides.
You see how well the tanks lay in this pretty picture by S.J. Alice Bennet (Photo 1)? Valves in the armpits. Tank perfectly parallel to the body along a line from the shoulder to the knee—not breaking above or below the profile of the body. Regulators and valves completely protected by your body, both from damage and from water disturbance, to create a wide, hydrodynamic platform.
That. That is what you are looking for. Not this (Photo 2), which is all-too-commonly seen. Like the profile of the Lusitania. As she is now. So, let’s not do that.
This is what we are aiming for (Photo 3). How we do this is one of the reasons that sidemount is a giant hassle—because it takes a handful of adjustments, which are all fussy, completely dependent on your personal frame, and for which even single centimeters matter.
In the simplest of terms, there are only two things that need to be adjusted—the bolt-snap and the tank neck bungee—but they each have a few subsections. See below:
Bolt-snap
• Height
• Leash length
• Angle
Tank neck bungee
• Height
• Loop length
• Strength
Seems easy, right? It is. And should not take but a half-dozen dives (at least) under supervision, with some video feedback, followed by fine-tuning with systematic minor adjustments after each dive, to get it just right. But if you were one of those people who decided they were going to figure it out on their own (stop it, take a proper class), let’s get started.
One more thing I want to say from the get-go: There is no way for me to cover, in these pages, every nuance of how things get perfectly dialed in—there are far too many variables. One of the biggest is steel versus aluminum (AL) tanks. The former just hang there where you clip them, whereas the latter will need to be reclipped to a set of d-rings farther towards your belly, perhaps several times, or need sliding d-rings to compensate for buoyancy shift. Honestly, steel tanks are easier.
Think of this article as more of a troubleshooting guide, using the more troublesome AL-80 tanks as a basis. Steel tanks will only be mentioned in passing.
Bolt-snaps
Height. This is the first place to start and, arguably, the easiest and most obvious thing to adjust (Photo 4). In these pictures, there are a couple of exaggerated band heights. In short, however high the band is on the tank is going to determine, in large part, how high or low on your body the tank is going to rest. This is going to depend, too, on whether you are using some version of a butt-plate or clipping the tanks to your waist.
In any case, you can start with a tape measure. Measure the distance from a point comfortably into your armpit down to where you expect to make your attachment point, either waist-belt or butt-plate. Then measure from the very top of the tank valve down and put a sharpie-mark on the tank at the same distance.
There. That is your band height starting point. It may need some fine tuning later, but it’s close.
Leash length. The leash is the little dongle of static line that attaches your bolt-snap through the airplane clamp. Here, you see a long one and a short one (Photo 5). Note: Pointing up or down does not matter—just make sure they are the same way around on both tanks; otherwise, your bolt-snaps will be just different heights enough to be really annoying.
This, too, is fairly easy. It is the distance from your attachment point down to where you want the tank to sit.
As I mentioned, most steel tanks tend to stay put, buoyancy-wise. If you are using steel tanks, you are probably using a butt-plate, which means you are going to need longer leashes. Start with three inches or so (longer if you have big hips, shorter if you are narrow) and then fine-tune as you see how your tanks sit. Once that is done, you are pretty much done; clip them and dive.
If you are using aluminum tanks, you are probably going to want the leashes as short as possible to keep the tanks under tighter control. That is pretty much it for leash length.
Angle. Where around the tank does the bolt-snap sit (Photo 6)? You have got a little bit of wiggle room, but a great place to start is at about that 45-degree angle between the very back of the valve and the bolted isolator post. This is another thing that is going to vary quite a bit, depending on personal taste, body shape and how hemmed in against your hips you like your tanks.
Closer to the 9 and 3 o’clock positions will give you a little more room if you prefer, or if you are a “hippier” person. Closer to the 12 o’clock position is better if you are narrow-framed or if you like everything really secure-feeling.
One additional thing of note here is that the farther to the 12 o’clock position the snaps are, it may be a little more difficult to argue with the bungee torque when you reclip the tanks as they are breathed down. The big thing to remember is to have them mirrored (Photo 7).
A last, short note about steel tanks (Photo 8): Because you do not need to counteract any bungee forces (you will see what I am talking about below), you can put the attachment point on the valve side of the tank. You can even just loop the bungee over the valve handle (instead of the isolator post) and be done with it. There are also a few harnesses that require this, or even a regulator “down” or “in” configuration. Some people simply prefer them.
Bungee
Height. If you have the bungee pulling from a point right at the base of your neck, that is going to affect where the tanks want to go as the bungees try to relax. Similarly, you do not want your bungee attachment points down in the very middle of your back.
Right between your shoulder blades. There. Done. That is where your bungees should be pulling from, so anchor them there. Some systems are inflexible about where this anchor point is, and some are super adaptable. Then, there are aftermarket bits you can buy to create your anchor point wherever you want.
Loop length and strength. These go hand-in-hand to dictate where the bungee “relaxes” to when you have got the tank attached. It should go without saying that this is also an adjustment where you want to make sure lengths are mirrored.
A good starting point is for the bungee loops, without tension or tanks, to hit dead center of your armpit. Very thick or stiffer bungee might need a little more length. With a “boing-ier” (flexible) bungee, you can get away with quite a lot of slop. I strongly recommend the latter, because it makes gearing up that much easier, and it does not take a lot of force to control the near-neutral AL-80 tanks anyway.
There is a point of diminishing returns for each, though. Bungee that is too “boingy” (flexible) and left too long, will allow the tank to wobble around like a shopping cart with a stiff wheel on your side. Stiff bungee that is kept too tight will rotate the handle (and the tank) in such a way that it is difficult to reach or manage.
Length and strength are one of those things you are just going to have to play around with a bit to hit the sweet spot of where you like it.
Strength, unfortunately, might be limited to what is available at shops near you. Length, however, is much easier to play around with; it is even easy enough to get your buddy to adjust, even in the water. Just leave a little extra length and do not tie tight stopper knots until after a good handful of dives.
Balancing forces
With all of this in mind, what you are looking to balance out are these forces (Photo 9). The attachment point towards your body and the bungee torque away from you are in direct contradiction. As are, obviously, positive and negative buoyancy.
Let’s look at some of the ways an imbalance of these forces may manifest.
Troubleshooting
Tank bottom too high. This is one of the simplest and most common problems (Photo 10). The tank base is riding too high. It could be that you have configured your harness with the initial clip point way too far back. Just as likely, you are just a little way into the dive and need to reclip. The buoyancy has started to shift positive as the tank has been breathed down, and you can use either a sliding d-ring or another attachment point on your waist to pull the whole base down. Easy-peasy.
Bungee too loose. Looks kind of the same, but it’s not (Photo 11). Your bungees are too long. Or may not be “boingy” (flexible) enough. Valves are probably pointing straight down because the tanks are hanging limply in that wet noodle of a bungee. Either way, if you get the valves controlled by tightening up that bungee a bit, you will be in great shape.
This is one of those things you probably wanted to remember to do after your last dive, so ask your buddy to come back with you to the surface to correct it before you start your new dive in earnest. With a really good team and a little flailing, maybe you can get it adjusted without surfacing.
Tank bottom too low. This is the opposite of our first picture (Photo 12). You have got your initial clip point configured too far forward. Or, maybe you have reclipped too soon.
There is a tricky, in-between period, if you are only using two sets of attachment points to change forward during a dive. Between about 2600-2300 psi (180-150 bar) where the tank base floats up at the initial point and down at the front attachment point. If you hate this as much as I do, it is time to get a third set of d-rings or sliding d-rings.
Getting those d-rings in just the right places along the waist strap can be a confusing exercise. You will look at two of them and say, “There’s barely space to fit a third in the middle! Why should it make such a difference from one to the other?” But it really does. Because it’s sidemount.
Honestly, I tend to favor sliding d-rings because I do not even like the in-between periods with three fixed. Worth noting: It is less likely, but possibly in part, because your bungee anchor point is too high up your back, and it is trying to pull your regulators up to the back of your head.
Tank bands are way too low and push the whole tank up past your armpit (Photo 13). You will not be able to use your arms. Your hoses will be all over the place. There is not a chance in the world you will be able to reclip because you are going to have to play tug-of-war with the bungee while you both unclip and try to reclip the bolt-snap. This is no fun.
Tank band can be too high up the tank, too (Photo 14). The tell-tale sign of this is that every time you kick, it feels like both tanks are waggling behind you like an unbalanced trailer on your car. Also, to reach your tank valves, it will feel like you are trying to fish something out of the back pocket of a pair of jeans that are too big.
This can often happen in conjunction with or simply because the tank bungee anchor is too low down your back. Remember: between the shoulder blades. Tighten it up.
OK, too tight! You have gotten really ambitious about having everything on lockdown (Photo 15). Stop trying to persuade your sidemount tanks to spontaneously become back-mounted doubles.
If you cannot reach your tank valves, it is because the force of the bungee is overriding the anchor of the clip and pulling the tank valve knob to point straight behind you. You probably cannot reclip either—because trying to manipulate the clip is going to be a losing war against mega-bungee. It probably feels like you cannot kick because your tanks are holding your legs together.
Calm down. Loosen up. Listen to some Grateful Dead or something.
Raise the bands a little. Loosen the bungees. (I do actually wear my CCR bailout this way because it is super out of the way. But I also have orangutan arms and can still manipulate my valves perfectly easily. I do not recommend it for everyone.) This is also a “maybe-the-bungee-anchor-is-a-little-too-high” moment.
A bit too loose. So, this one is not actually a disaster (Photo 16). There are some harnesses designed specifically so that the tanks will ride like this. Which is OK, I guess. They are protected. They are streamlined. They are easy to safely manipulate and operate. And they do not change your profile... too much... I guess. I tend to think of this as front-mounted, though. There is such a thing as being “too relaxed.”
Conclusion
I hope that if you have made it this far, you have either learned something, thought of a new way to convey some of these ideas to your friends/students/dive buddies/people who do not care about diving but you talk at them about it anyway. If there is any definitive conclusion, let it be this: As you are dialing in a sidemount system, make only one adjustment per dive. Seriously, just a centimeter at a time—a full inch can frequently knock you too far in another direction. Have a friend shoot a bit of video of you so you can see how the tanks look and match that up with how they feel.
Dive safe, dive often. ■
American technical diver and instructor Roger Williams first discovered technical diving while living in his native New Jersey and used to be an ardent diver of the New York/New Jersey wrecks. He even used to tell people that it was the best place in the world to dive for years while working as full-time instructor in Hawaii. But that was a long time ago—before he found his heart in the caves. For some years, he was the Dive Safety Officer for the Wildlife Conservation Society’s (WCS) New York Aquarium in Brooklyn. Currently (and for the foreseeable future), he and his wife, Nelly, own and operate XOC-Ha, a divers’ bed-and-breakfast near Akumal, in the heart of Mexico’s cave country. He teaches cave, technical and CCR diving, while Nelly creates sorcery in the kitchen for their guests. If you see him staring off into space and ask, “What are you thinking?” He will probably say, “Safety, balance, stability and team problem solving.” And you would be perfectly within your right to say, “About dinner! I meant, what are you thinking about ordering for dinner?” For more information, see: XOC-Ha.com. Or Facebook and Instagram @xochabnb.
Download the full article ⬇︎