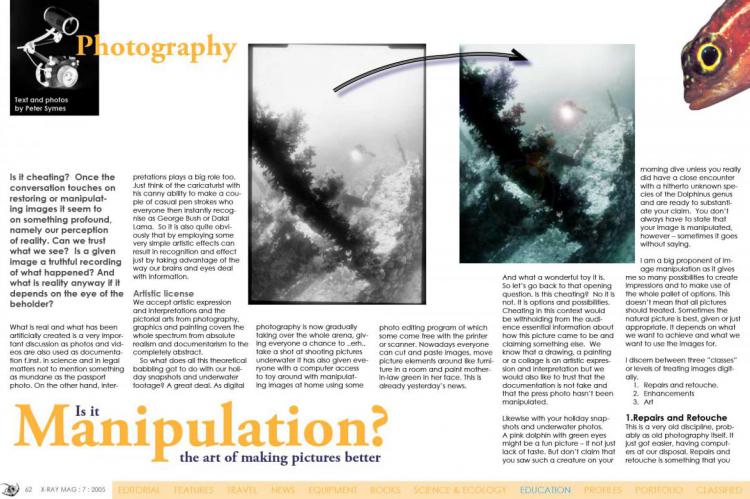
Manipulation
Is it cheating? Once the conversation touches on restoring or manipulating images it seem to on something profound, namely our perception of reality. Can we trust what we see? Is a given image a truthful recording of what happened? And what is reality anyway if it depends on the eye of the beholder?
What is real and what has been artificially created is a very important discussion as photos and videos are also used as documentation f.inst. in science and in legal matters not to mention something as mundane as the passport.
On the other hand, interpretations plays a big role too. Just think of the caricaturist with his canny ability to make a couple of casual pen strokes who everyone then instantly recognise as George Bush or Dalai Lama. So it is also quite obviously that by employing some very simple artistic effects can result in recognition and effect just by taking advantage of the way our brains and eyes deal with information.
Artistic license
We accept artistic expression and interpretations and the pictorial arts from photography, graphics and painting covers the whole spectrum from absolute realism and documentarism to the completely abstract.
So what does all this theoretical babbling got to do with our holiday snapshots and underwater footage? A great deal. As digital photography is now gradually taking over the whole arena, giving everyone a chance to ..erh.. take a shot at shooting pictures underwater
it has also given everyone with a computer access to toy around with manipulating images at home using some photo editing program of which some come free with the printer or
scanner. Nowadays everyone can cut and paste images, move picture elements around like furniture in a room and paint mother-in-law green in her face. This is already yesterday’s news.
And what a wonderful toy it is. So let’s go back to that opening question. Is this cheating? No it is not. It is options and possibilities. Cheating in this context would be withholding from the audience essential information about how this picture came to be and claiming something else. We know that a drawing, a painting or a collage is an artistic expression and interpretation but we would also like to trust that the documentation is not fake and that the press photo hasn’t been manipulated.
Likewise with your holiday snapshots and underwater photos. A pink dolphin with green eyes might be a fun picture – if not just lack of taste. But don’t claim that you saw such a creature on your morning dive unless you really did have a close encounter with a hitherto unknown species of the Dolphinus genus and are ready to substantiate your claim. You don’t always have to state that your image is manipulated, however – sometimes it goes without saying.
I am a big proponent of image manipulation as it gives me so many possibilities to create impressions and to make use of the whole pallet of options. This doesn’t mean that all pictures should treated. Sometimes the natural picture is best, given or just appropriate. It depends on what we want to achieve and what we want to use the images for.
I discern between three ”classes” or levels of treating images digitally.
1. Repairs and retouche.
2. Enhancements
3. Art
1.Repairs and Retouche
This is a very old discipline, probably as old photography itself. It just got easier, having computers at our disposal. Repairs and retouche is something that you should always do to pictures you want to show others. Every picture has some small flaws, which may be more or less obvious. For those still using film it can be scratches on the negative or slide, dust on scanning or other physical blemishes. Get rid of them.
In old days such corrections were done with squinting eyes and a neurosurgeon’s steady hand working with a scalpel working directly in the emulsion, and filling in colour directly into the scratches and blemishes so they blended into the background. Doing portrait photography one would often also enhance the looks, removing skin blemishes once you were at it anyway. And what do you know – it seems that we are already enhancing reality and pretending it is something else.
Cloning
Removing dust and scratches is not bettering reality, however. It is repairing the reproduction. On the computer we can either use a number of software filters, or by ”cloning”, which is the preferred method, although a bit more laborious. By cloning, we copy from area of the picture without blemishes. The big picture in the previous pages is the original scanning of our sample picture. There is a lot of dust on it. On fig 2 and 3 are shown how the Rubberstamp is used – this is a tool in many software packages – by which colour is transferred from one area to another. In this case to overlap the dust particles. The main issue with this technique is finding the right area (colour) to clone from, so the end result doesn’t stand out as a dark or light spot.
”Remove dust & scratches” filters does come with many of the image-editing software packages, which offer a temptingly quick click-a-button solution to the problem. But there are no such thing as free lunch here either – these filters are not intelligent enough and will also soften and blur every other fine line and structure in the image. As always, it is the good old fashioned manual methods which give optimal control and hence the best results. It does, however, takes longer time but if the picture is going to be used in some kind of presentation the extra effort is just something that goes with it.
How to...
Use the inbuilt magnifier function so you can see all the details and scroll through the image in a grid patters, and remove dust and scratches. The bane of all underwater photographers, backscatter and sand particles, can also be removed or reduced this way.
2. Enhancements
Moving into the transition zone. From our basic scuba training we know that we lose colour with depth and consequently the resulting pictures often look flat and monotonous – unless we bring a light source of our own, such as a flash. We often also experience a haze stemming from particles in the water. In these instances a little toning up may be called for. Figures 4 and 6 shows the basic idea. On fig 4 we have the original scanning - and yeah, it is rather dull – and on fig 6 have touched the wee goatfish up to match my memory of the encounter.
What did I do here?
First, as always, dust etc has been removed to clean up the image as describe above. Then I subdivided the image into three parts I treated differently. The three parts in question is the body of the fish, the eye and the background. To treat these areas seperately we have to mask them off – like when we spray paint something, see figure 5. In your image-editing software there is various functions to create such masks. Their function is to delimit whatever controls and filters to a selected area of the image. Tracing the contour of the area with the mouse I outline the mask and save it as separate image layer
I first made a little mask for the eye (not shown). It is important that the eye stands out clearly and sharply. Cloudy areas in the iris was blotted out, the contrast enhanced and the lens made darker by reducing the mid tones. This created a clear gaze. Activating the mask shown in fig 5 I then started working on the body.
The yellows and reds were strengthened and the mid tones enhanced to produce better saturation of the most important colours. Inverting the mask to working on the background, by contrast, the blues and greens were enhanced to create depth and pull out the difference between the fish and the background. It is important to apply these adjustments very conservatively. A little too much and the whole scenario will look artificial – like old Technicolour movies.
Finally, the whole image was artificially sharpened by applying the strangely named function ”unsharp mask”. Obviously we can’t really make picture sharper ...
(...)
Download the full article ⬇︎
Originally published
X-Ray Mag #7
BALI - visiting Tulamben. Science: Salt of the sea. Conservation: Mangrove. Polluce wreck. The first frogment. The Techni-sub story. Royal Tasmania. Portfolio: A tribute to Michael Portelly. Technical matters: Going solo or not? Photography: Manipulation? Ecology: Anemone city Profile: Miranda Krestovnikoff. Science: Drinking seawater