Retouching Underwater Images
It should not happen but sometimes it does anyway: those annoying little white dots in our underwater images, which detract from the overall impression of the photograph. Known as backscatter, these dots appear when small particles in the water reflect the light from a strobe. The more directly the strobe light hits a subject, the higher the risk of backscatter. That is why a strobe should not be pointed straight at a subject. Indirect lighting (by angling your strobes slightly outwards or inwards but never directly toward the subject) is the main “trick” to minimise or even prevent backscatter.
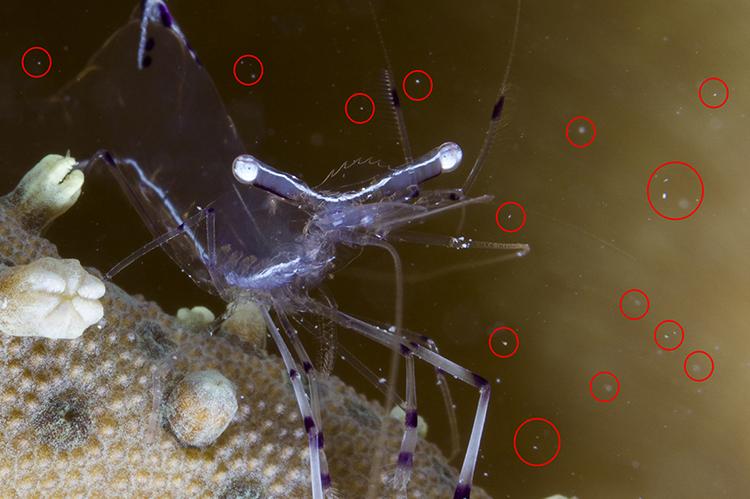
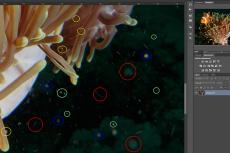
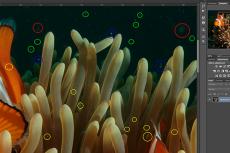
Image 2. Problem zones can be identified (red circles) by zooming into an area of the tutorial image. Photo by Rico Besserdich.
Tags & Taxonomy
Not much can be done with an underwater image that is covered with “white snow,” but to get rid of a few backscatter dots is no big deal. How many “dots” you are willing to remove is up to you, but it also depends on the image as well as how much labour you are willing to invest in postproduction. Just keep in mind that hours spent with the camera underwater are way more fun than hours spent in front of a computer.
Basic retouching in Adobe Camera Raw and Lightroom
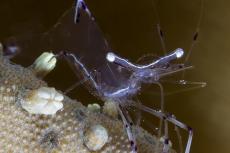
For this tutorial, I have found an image (from the Red Sea in Egypt) of a shrimp on soft coral (see Image 1). I adjusted the white balance, made a few very subtle exposure corrections and a slight curve alteration for the contrast. This image looks okay to me so far, but there are several backscatter dots, which were caused by my not-very-cleverly-positioned strobe light. See Image 2 for a zoomed-in view of the tutorial image with a few of those little troublemakers circled in red.
It is crucial to always zoom in to 100% magnification when post-processing your photographs, checking for fine details, working with full concentration and accepting nothing less than the best as a result. In this example photo, I find it acceptable to spend a little time (this is a five- to ten-minute job in postproduction) to get rid of those backscatter dots, especially because the backscatter is in the image’s background and does not cover the main subject (the shrimp).
For such a task, I personally prefer to use Photoshop, but a small amount of backscatter can be fixed with Adobe Camera Raw (ACR) or Lightroom as well. First, I will show you how to do it in ACR and Lightroom. Advanced techniques and usage of tools in Photoshop will follow afterwards.
For both Photoshop and Lightroom, there are ready-made filters, plug-ins and “action scripts” available that pretend to fix such backscatter problems automatically. But most of these “automatic” functions employ blur filters, which—upon first impression—indeed eliminate the disturbing dots, but at the cost of losing important image details. That is why my personal choice is to do such fixes the “manual” way, trying to keep as much image details and digital information as possible. An image with a terrifying amount of backscatter in it is an image that I would throw into the bin and try to do better the next time—with my camera, that is, not with Photoshop.
How to fix a few backscatter dots in ACR:
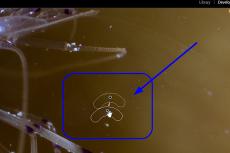
1. Open your image in ACR. (See Screenshot 1)
2. Zoom into the image to locate the “trouble zones.”
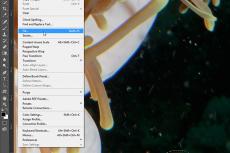
3. Select the Spot Removal Tool (the eighth icon in the toolbar at the top, or shortcut “B” on your keyboard).
4. Make sure that the tool is set to “Heal” and the opacity is set at 100%.
5. Locate a backscatter dot and set the radius of the Spot Removal Tool to a size in which its circle is just a bit larger than the backscatter dot you want to remove.
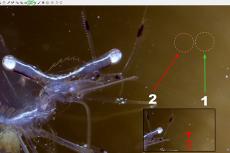
6. Click on the backscatter dot. You can now see two circle-shaped areas: The red one is the area that will be fixed (the target) and the green one is the area where ACR takes the information of an area with “correct” information (with no backscatter), which will be used to erase the backscatter (the source). You can move the green circle with your mouse until you are satisfied with the result.
Red circle: This is the area of the image that you want to fix. It is already fixed; check the inset square to see how it looked before.
Green circle: From this image area, a sample will be taken to repair the “trouble zone.”
Not only should you choose a “healthy” area—one with no backscatter—but also one that has the same colour information as your target. Choosing, for example, a blue area to fix a backscatter dot in a yellow area would result in a blue dot in place of the backscatter dot.
TIP: Always work in 100% magnification. You can easily switch between the Spot Removal Tool (B) and the Hand Tool (H) for moving around in your image in higher magnification.
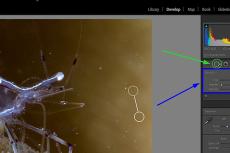
In Lightroom, the technique works in similar ways. The Spot Removal Tool is located in the “Develop” panel on the right and can be activated with the keyboard shortcut “Q” (see Screenshot 2).
Please note that newer versions of Adobe Lightroom and Adobe Photoshop do not limit you to circle-shaped spot removal tools anymore. You can now “paint” freely with the Spot Removal Tool to “heal” areas with different shapes (see Screenshot 3).
After ten minutes of work, we have fixed the backscatter! (See Image 3)
Advanced retouching in Adobe Photoshop
While ACR and Lightroom provide basic tools for getting rid of a few backscatter dots and other smaller distracting elements in our underwater images, sometimes there are cases that require finer and more precise tools. Such tools are found in Adobe Photoshop.
A few notes before we get started: There are automated functions and ready-made “actions” in Photoshop that promise to “automate” specific steps in editing, such as backscatter removal. The problem here is that all these functions use blur filters, which may indeed wipe out backscatter, but they will most certainly wipe out lots of image details too. Therefore, I always recommend doing it manually, to keep as much of the original image details as possible.
Now, let’s begin with an image of an anemonefish (from Anilao in the Phillipines). (See Image 4)
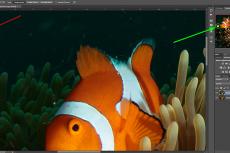
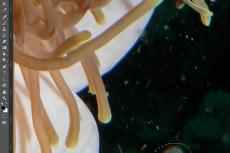
As we can see on first viewing, quite a lot of backscatter detracts from the image. But there are a few other issues as well, including dirt, particles and a few flares, probably caused by dirt or small air bubbles on the front glass of the camera housing’s port.
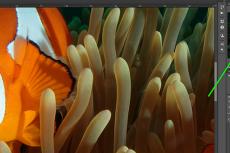
To view those little troublemakers, we need to zoom into 100% magnification. I usually use Photoshop’s Navigator screen (at the top right) for this. The red rectangle marks the visible area, and you can drag it around with your mouse, carefully observing all the areas of the image in 100% magnification. This is the moment of truth. (See Screenshot 4 and 4a)
Having done that, I grabbed a few areas of the image, marking different issues with different colours (see Screenshot 4, and Screenshot 5):
Green: This has very small dots in a neutral area, which are easily removed with the Spot Removal Tool.
Blue: This has larger areas of backscatter—usually a case for the Healing Brush Tool.
Red: This has larger flares or dirt, mostly in neutral areas. Here, lots can be fixed with Photoshop’s new Patch Tool. Or with the “special weapon” of newer Photoshop versions, which I will introduce in a bit.
Yellow: This has backscatter or other small distracting elements that are on the main subject (the anemonefish) itself or very near to it. For the most part, the Healing Brush Tool works well here.
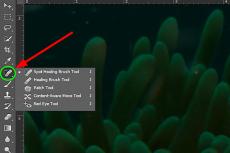
Photoshop comes with several cool tools that help us fix these types of problems. The classics, and actually the tools of choice in 99% of all cases, are the Spot Removal Tool, the Healing Brush Tool and the Patch Tool. You can access them with the seventh icon in Photoshop’s toolbar on the left side. (See Screenshot 6).
A classic “starting position” for working with those tools would be to have a 100% magnification of your image, a copy of your background layer and the Navigator window (top right) activated. Always work in 100% magnification and move the red rectangle on the Navigator screen to edit each visible area step by step. See Screenshot 7 for our start screen.
The functions of the tools
1. Spot Removal Tool
This tool removes spots by sampling surrounding areas. Once you have clicked on a small spot you want to remove, check that the tool size is just slightly larger than the spot, using the right-mouse-click menu. Then the tool basically determines a “problem” zone and looks around for a “healthy” zone nearby for sampling.
It works well for removing small dots and backscatter in neutral areas, but only if a “healthy area” with similar colour information is nearby. You cannot select the area from which this tool takes the sample. But in this example, it works well with my green-marked areas.
2. Healing Brush Tool
Same concept but with one big difference: You have the ability to choose the “healthy” area to sample by holding the ALT key on your keyboard, clicking on an area from which to take the “correct” information, and then clicking on the area you want to fix. This tool works well for areas with lots of different colour information or variation, such as the yellow- and blue-marked trouble zones.
3. Patch Tool
With this tool, you can select a larger “problem zone” in your image, then just move the selection to a “healthy” zone and Photoshop does the rest (TIP: Do not forget to hit Deselect after the fix). It works very well; however, larger zones to be fixed (e.g. an area of your image with lots of larger backscatter dots or flares in it) require the existence of larger “healthy” zones to be sampled—with similar colour, of course. Otherwise, you would just resample your own mistakes!
The Patch Tool works well for larger “troublemakers,” such as dirt (on the port) or flares. See the red-marked areas in the tutorial picture.
This is why I recommend starting with the “small” and working up to the “big.” First, fix the smallest backscatter dots (green), then the mid-sized ones—those that are on or near the subject (blue and yellow)—and lastly, the big nasty ones (red).
Content-Aware Fill
In newer versions of Adobe Photoshop (in all “CC” editions), another quite impressive tool is hiding in the menus—a real weapon that works just perfectly for the “big nasty guys” such as large lens flares and large dirt particles. It is so powerful, it even can erase a scuba diver, or any other “unwanted” object, out of your image and no one would ever know it had been there. But that would be a very serious image manipulation (don’t get caught!) so I prefer to introduce this tool and its use for only classic and “honourable” retouching purposes.
The Content-Aware Fill Tool replaces any area you select with content that can be found around or near the selected area. It works extremely well with “larger troublemakers.”
How to use it, in brief:
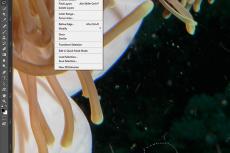
1. Use the Lasso Tool (the third icon in the left-side toolbar) and roughly draw a selection around the part of the image you want to go away (in my example, a nasty flare). (See Screenshot 8)
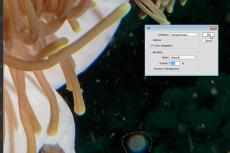
2. In the upper menu of Photoshop, go to Edit > Fill. (See Screenshot 9)
3. In the pop-up menu, make sure that “Content-Aware” is selected in that drop-down menu, the checkbox for “Color Adaptation” is checked, “Mode” is set to “Normal,” and “Opacity” is set to 100%. (You do not have to do that every time. Photoshop will remember your settings). If all of that is checked and done, hit “OK”—and see the nasty flare not only disappear before your very eyes but even get replaced with content that exactly matches the area around it. The Content-Aware Fill Tool is far superior to the classic Clone Stamp Tool of Photoshop, as the Clone Stamp Tool always slightly softens “cloned” areas while the Content-Aware Fill tool does not. This tool is very, very clever, and it is worth those few extra steps you have to do when using it. (See Screenshot 10)
4. You may now search for more “nasty big things” upon which to use this tool. When done, click Deselect in the Select drop-down menu (keyboard shortcut: CTRL+D). (See Screenshot 11)
Afterthoughts
There is no need to be scared of Photoshop. Think of it as a workshop in which you store your tools, or perhaps think of it as your kitchen. Once you can recall where the screwdriver, saw, hammer, spoon or beer glass are stored, you can use them right away. Photoshop is no different. The key is to know which tool can fix which “problem.” (See Image 5 for the final retouched version). Happy retouching! ■
Rico Besserdich is a widely published German photographer, journalist and artist based in Turkey. Visit: . See his latest book at: Songofsilence.com.
Download the full article ⬇︎


